The Complete Guide to Huda Beauty Powder: How to Use, Tips, Alternatives, and Troubleshooting
Introduction
Huda Beauty powder — most notably the Huda Beauty Easy Bake Loose Baking & Setting Powder — is a popular choice for setting makeup, blurring texture, controlling oil, and delivering a long-lasting finish. Whether you’re a makeup beginner or a pro, understanding how to use Huda Beauty powder properly will help you achieve smoother foundation, crease-free under-eyes, and a camera-ready complexion. This guide explains application techniques, step-by-step baking and setting methods, product recommendations and alternatives, common problems and fixes, and professional tips to get the most out of your Huda Beauty powder.
Why this matters
- Setting powder is essential for locking foundation and concealer in place, reducing shine, and preventing transfer.
- The right technique avoids cakiness and flashback while maximizing longevity.
- Huda Beauty powder is formulated to be finely-milled and blurring — but technique, product choice, and skin type determine results.
What you’ll learn in this guide
- Proper everyday setting and baking workflows using Huda Beauty powder
- Tips for different skin types (oily, dry, mature, acne-prone)
- Troubleshooting: flashback, creasing, cakey finish, excess oil
- Best product matches and alternatives
- FAQs and further reading
Understanding Huda Beauty Powder
- Main product reference: Huda Beauty Easy Bake Loose Baking & Setting Powder — a finely-milled loose powder designed to set makeup, brighten, and blur texture.
- Typical claims: lightweight, micro-fine texture, oil-control, long-wear, blur effect.
- Common formats: loose powder (most popular), and sometimes pressed powders or variants (check latest releases).
- Key ingredients often include talc, silica, mica — check the ingredient list if you have sensitivities.
How to Use Huda Beauty Powder — Step-by-Step Instructions
1. Everyday setting (light, all-over)
- Complete skin prep: cleanse → moisturize → primer.
- Apply foundation and concealer as usual; blend well.
- Tap a small amount of Huda Beauty powder into the lid.
- Dip a fluffy brush or powder puff and tap off excess (a light dusting is usually enough).
- Sweep or press powder over the T‑zone and areas prone to oil or texture.
- For under-eye: use a smaller fluffy brush, lightly press the powder where you need mild setting.
- Finish with a light mist of setting spray to meld powders and eliminate any powdery finish.
Tip: Use less powder and layer if needed to avoid a heavy finish.
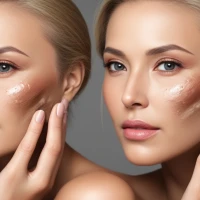
2. Baking method (for longer wear and brightening)
- Prep skin, apply foundation and under-eye concealer.
- Using a sponge (preferably damp), press concealer into the under-eye.
- Dip a damp or dry sponge into the powder or use a small dense brush to deposit powder into the under-eye triangle and other baking zones (nose sides, crease lines, under mouth if desired).
- Apply a generous layer — you should see a visible layer of powder.
- Let powder sit (bake) for 3–10 minutes depending on humidity/skin type (start with 3–5 minutes and adjust).
- Use a clean fluffy brush to gently sweep away excess powder, buffing to blend the edges.
- Finish with a setting spray to remove any remaining powdery cast and lock everything in place.
Note: shorter bake times (3–5 minutes) often reduce the risk of flashback while still setting concealer.
3. Spot-setting for oily skin / high-wear areas
- After foundation, press powder into the T-zone, chin, and sides of the nose with a damp sponge or powder puff.
- For extra hold, repeat midday with a very light dusting using a pressed or compact powder.
Detailed Tips & Best Practices
- Less is more: Start with minimal powder. You can layer gradually.
- Tools matter:
- Fluffy, natural-hair or high-quality synthetic brush for light application.
- Densely-packed sponge (beauty sponge) for pressing and baking.
- Small tapered brush to set under-eye and inner corner areas precisely.
- Dampen your sponge slightly for a more seamless, pressed finish and to reduce overt flashback.
- Choose the right shade: Huda offers translucent/banana-toned options — pick the one that brightens without leaving a white cast for your undertone.
- Use setting spray after powder to “melt” the powder into skin and reduce powdery finish.
- Layer strategically: apply thinner to medium layers for normal/dry skin; more targeted pressing for oily areas.
- For mature skin: avoid heavy baking in fine-line zones — use a light dusting and press method to minimize settling into lines.
Product Recommendations and Alternatives
- Recommended: Huda Beauty Easy Bake Loose Baking & Setting Powder (best for: brightening, bake technique, oil control)
- Alternatives:
- Laura Mercier Translucent Loose Setting Powder — iconic for smooth, photofriendly finish
- RCMA No-Color Powder — budget-friendly, invisible finish, great for all skin tones
- Charlotte Tilbury Airbrush Flawless Finish — for a blurring, skin-like finish
- Fenty Beauty Pro Filt’r Instant Retouch Setting Powder — wide shade range, good for deeper tones
- Hourglass Veil Translucent Setting Powder — talc-free, finely-milled, luminous
Comparison Table: Huda Beauty powder vs. popular alternatives
| Product | Finish | Best for | Price point | Notable |
|---|---|---|---|---|
| Huda Beauty Easy Bake Loose Powder | Silky, slightly brightening | Baking & long wear | Mid-range | Known for blur/brighten |
| Laura Mercier Translucent Powder | Natural matte | Photographic finish | Mid-high | Classic, smooth |
| RCMA No-Color Powder | Matte, invisible | All skin tones, budget | Budget | No flash, pro favorite |
| Fenty Pro Filt’r Powder | Soft matte | Wide shade diversity | Mid | Good for deeper skin tones |
| Hourglass Veil Powder | Luminous, talc-free | Dry/mature skin | High | Talc-free option |
Note: Prices and availability vary by region and time.
Troubleshooting: Common Issues & Fixes
Problem: Flashback in photos (white cast)
- Fixes:
- Use a smaller amount of powder and press instead of sweeping.
- Choose a powder shade that matches undertone (avoid super-white).
- Let the powder sit 1–2 minutes and buff away excess before taking photos.
- Use a setting spray to reduce powdery finish.
Problem: Cakey or heavy finish
- Fixes:
- Use less product and layer gradually.
- Make sure moisturizer and primer are fully absorbed before powdering.
- Swap a fluffy brush for pressing with a damp sponge to get a more skin-like result.
Problem: Creasing under eyes
- Fixes:
- Use thin layers of concealer and blend well before setting.
- Press powder using a damp sponge to set without overloading product.
- Avoid baking too long; 3–5 minutes often sufficient.
Problem: Excess oil after a few hours
- Fixes:
- Set the T-zone with powder focused on oily zones.
- Use blotting papers midday and reapply a light dusting of powder if needed.
- Pair powder with a mattifying primer and oil-free foundation.
Problem: Dry or flaky patches after powdering
- Fixes:
- Exfoliate and hydrate skin consistently.
- Apply a hydrating primer and a lighter hand with powder.
- Use a hydrating setting spray after powder to restore dew.
Safety Considerations and Warnings
- Avoid inhalation: Loose powders can be easily inhaled; use in a ventilated area and avoid vigorous shaking.
- Allergies/sensitivities: Check ingredient list (talc, parabens, fragrances, mica) if you have sensitive skin or known allergies.
- Avoid broken or irritated skin: Do not apply powder over open wounds or inflamed acne without dermatologist advice.
- Cruelty and market considerations: Brand cruelty-free status can depend on where the product is sold; verify brand statements for your region.
Advanced Techniques & Insider Tips
- Hybrid technique: Mix a small amount of powder with a damp sponge and press to create a quasi-cream finish without cakiness.
- Spot brightening: Use a banana-toned Huda shade only on the inner corner triangle to brighten while keeping the rest translucent.
- Longevity hack: Lightly set lips and brows with a dusting of translucent powder under lipstick or on top for longer wear.
- Texture blurring: Apply a superfine layer over areas with visible pores, then use a dense brush to blend edges.
FAQ (SEO-friendly, voice-search ready)
Q: How do you use Huda Beauty powder? A: Prep skin, apply foundation/concealer, then lightly press or sweep Huda Beauty powder over areas you want to set or control oil. For baking, apply a generous layer, let sit 3–10 minutes, then dust away excess.
Q: Is Huda Beauty Easy Bake powder good for oily skin? A: Yes — it’s designed to control oil and provide long wear. For oily skin, press the powder into the T-zone and bake selectively only in high-oil areas.
Q: How long should you bake with Huda Beauty powder? A: Start with 3–5 minutes; you can extend to up to 10 minutes in dry or humid climates, but shorter times often minimize flashback.
Q: Will Huda Beauty powder cause flashback? A: Flashback can occur with any powder if too much product or a brightening (white) shade is used. Use the correct shade, press rather than sweep, and mist setting spray afterward to reduce flashback.
Q: What’s the difference between setting and baking with Huda Beauty powder? A: Setting uses a light dusting to lock foundation; baking uses a heavier layer left to sit to better brighten and lock cream products in place.
Related Topics / Further Reading
- How to choose the best setting powder for your skin type
- Baking vs. setting: pros, cons, and when to use each
- Best makeup brushes and tools for powder application
- How to prevent flashback in photos and videos
- Cruelty-free and talc-free setting powder alternatives
Conclusion and Summary
Huda Beauty powder, particularly the Easy Bake Loose Baking & Setting Powder, is a versatile tool for setting makeup, brightening concealer, and controlling oil. Mastery comes from technique: start light, use the right tools, choose an appropriate shade, and blend well. For longer wear, use baking selectively and finish with a setting spray to avoid a powdery look. If you experience issues like flashback or cakiness, adjust product amount, application method (press vs sweep), and bake time. With the tips and troubleshooting in this guide, you should be able to use Huda Beauty powder confidently for daily wear, photos, and long events.
If you’d like, I can:
- Suggest a tailored routine for your specific skin type and undertone.
- Compare Huda Beauty powder shades against your current foundation for shade matching.
- Provide shopping links or price comparisons (region-specific).